
NetMeter Networking/Troubleshooting Guide
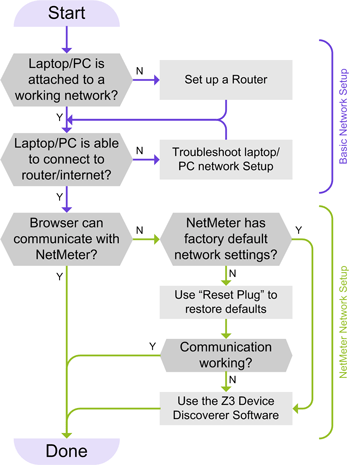
Network Troubleshooting OverviewUse this guide to help you establish communication with NetMeter devices.
This article assumes that you have a basic understanding of networking. For example: You can set up a simple home network.
If your networking experience is limited, consult some online articles about networking before proceeding.
STEP 1: Setup a Router
First, make sure that you have a working local area network (LAN).
If the NetMeter has been plugged into an existing working network, and your laptop is connected to the same network, and you are able to communicate with other resources on the network (the Internet for example) then you can skip this step.
The following materials are required for this step:
- A small "home style" router such as Linksys, D-Link, or other popular models that may be found at a local computer store.
- Two standard ethernet cables (one ethernet cable is supplied with the NetMeter)
- A laptop or PC
Procedure:
- Disable WiFi communications on your laptop to ensure that you're not connected to another network. We will use only the wired Ethernet connection to guarantee communication on the correct network.
- Follow the vendor's instructions for unpacking and setting up the router. An Internet connection is not required.
- Using an ethernet cable, connect the laptop/PC to one of the LAN ports on the router. Routers typically have 4 LAN ports and one connector labled WAN, Internet, or Modem. This port will not be used for this tutorial.
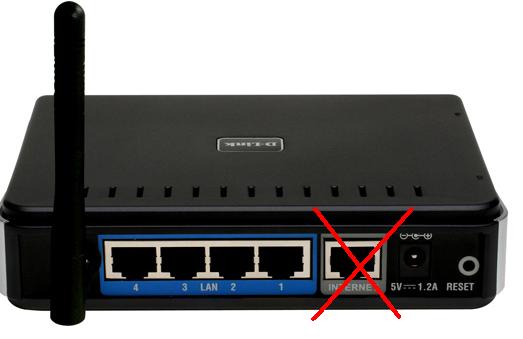
- Connect the NetMeter on another LAN port on the router. Again, do not connect to the WAN/Internet/Modem port.
- With the laptop and router powered up, try to connect to the routers web interface which is often found at the IP address 192.168.0.1 or 192.168.1.1 by default (consult router documentation).
- If you cannot get connected to the router then consult your routers documentation to troubleshoot the connection between your laptop and the router.
Possible reasons why your laptop may not be able to connect to the router:
- Physical connection: make sure that the ethernet cable between the laptop and the router is working. You should see LEDs on the ethernet jack on your laptop lighting up and blinking. If not, try another cable.
- The ethernet port on the laptop is not configured properly: use a command prompt and perform the following commands:
ipconfig /renew
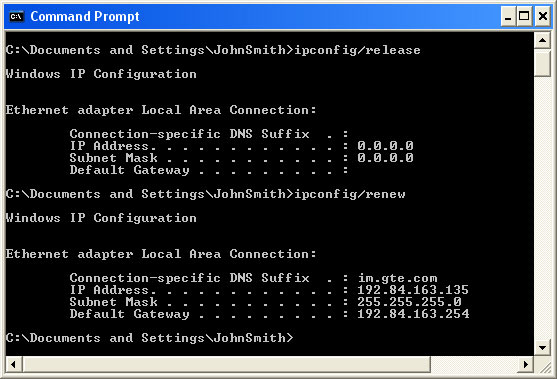
As in the above screenshot, the ethernet adapter local area connection should have an IP address that has been assigned by the router.
When your laptop is connected to your router, proceed to Step 2.
STEP 2: Connect the NetMeter to the LAN
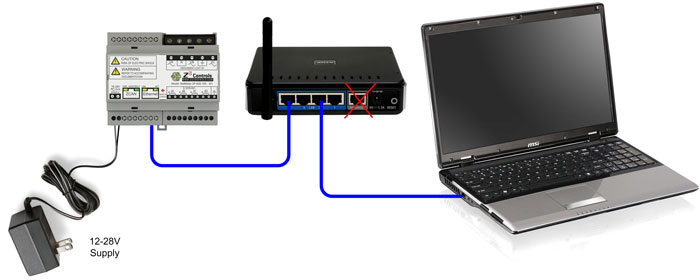
- Safely provide 12-28 volts to the NetMeter's power supply connection. If the NetMeter is outside of a NEMA enclosure, it may be powered safely by using a small "wall wart" style power supply.
- Using a web browser on the laptop, try to connect to the NetMeter at the following address: http://netmeter/
If the network is set up properly then the NetMeter should respond and you are done. If not, then proceed to the next step.
STEP 3: Troubleshoot the Network
- If the NetMeter has been used before, then it may have been set for a static IP address that is incompatible with the settings on the router. If this is the case then use the Restoring Network Communication proceedure.
- Use the Z3 Controls Device Discoverer to find the NetMeter on your network. You can download it here: Z3 Controls Device Discoverer. After downloading, installing, and running the Device Discoverer, the NetMeter IP address should be revealed. Double-click on "NETMETER" to launch the NetMeter in your browser or enter the IP address shown into your browser.
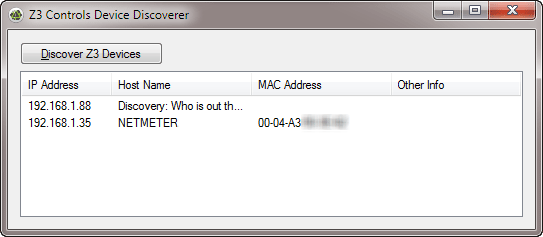
Z3 Controls Device Discoverer Example Screenshot
Direct Network Connection
It is possible to connect directly to the NetMeter as pictured below. However, this is not a recommended method because it will require you to make tedious changes to your laptop's network configuration whenever you want to connect. The use of a router as described above is much more convenient. Z3 Controls will not provide technical support for this connection method.
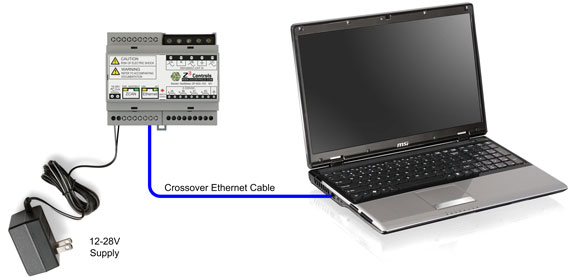
An Ethernet crossover cable is required for this method. A normal Ethernet cable will not work. Ensure that the Ethernet LEDs on your laptop and/or on the NetMeter are on or blinking to verify the physical connection.
In order to use a crossover cable with the NetMeter (or any IP addressable networked device) you will need to manually configure the network settings on your Computer. Here is a website to explain how this is done: http://www.howtogeek.com/howto/19249/how-to-assign-a-static-ip-address-in-xp-vista-or-windows-7/
Choose an IP address for your computer that is in the same subnet (starts with 192.168.2) as the NetMeter but not the same IP address as the NetMeter (is not 192.168.2.200).
By default, the NetMeter comes up at IP address 192.168.2.200 (this will be overwritten if you have set a static IP address set up in the NetMeter network configuration or if the NetMeter was able to obtain an IP address from a DHCP server).
In the case that the NetMeter is using its default address (192.168.2.200) set your PC to an address like 192.168.2.2 with a subnet mask of 255.255.255.0 and other parameters just like what is shown in the Link above (but don't bother with the validate settings).
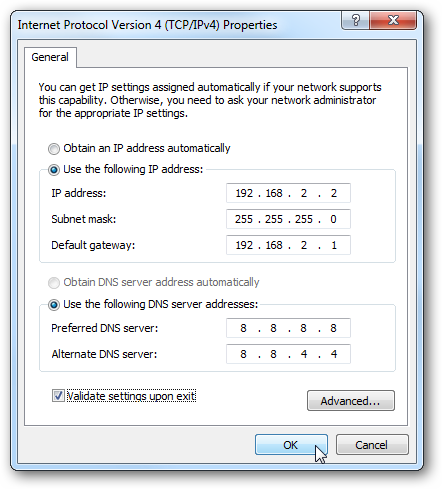
Once your laptop is set up this way then you should be able to access the NetMeter at http://192.168.2.200